

How to Fix a Swimming Pool Liner: A Complete Repair Guide
A damaged pool liner can quickly turn your backyard retreat into a source of stress. Whether you’ve noticed a small tear or areas showing wear, it’s important to address liner problems promptly. Early repairs help prevent water loss, structural damage, and the high cost of replacement. This repair guide will show you how to patch your pool liner and keep it in top shape.

Shop pool liner repair solutions here!
Essential Tools and Materials for Pool Liner Repair
Before you begin, make sure you have these essentials:
- Vinyl pool liner patch kit (available at most pool supply stores or amazon)
- Waterproof adhesive formulated for pool liners
- Scissors (for cutting patches to size)
- Clean cloth (for cleaning the repair area)
- Fine-grit sandpaper (to lightly roughen the area for better adhesion)
The right materials will help your repair last and stand up to constant water exposure and pool chemicals.
Step-by-Step Guide: How to Patch a Pool Liner
Step 1: Locate and Assess the Damage
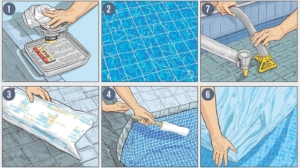
Start by thoroughly inspecting your pool liner for tears, punctures, or worn spots. Small tears (under 2 inches) are ideal for do-it-yourself patching. Check both above and below the waterline, since damage can happen anywhere.
Focus on the waterline—if your pool’s water level has stabilized, the leak is likely near there. Even small holes can cause considerable water loss, so identifying all points of damage is crucial.
For underwater repairs, only proceed if you are properly trained and equipped. Use a pool-safe dye test to pinpoint hard-to-find leaks, as even tiny holes can cause problems over time.
Step 2: Prepare the Area
Once you’ve found the hole or tear, clean the area thoroughly with a clean cloth and water to remove any dirt, oils, or chemical residue.
Gently sand a 2–4 inch area around the damage using fine-grit sandpaper. This helps the patch adhere better.
Step 3: Cut Your Patch
Cut a patch from your repair kit that extends at least 2–4 inches beyond the tear on every side.
- For bottom corners, make sure the patch is at least three times the size of the
- For tears over 2 inches, cut the patch at least four times larger than the
- For flat floor areas, a patch that is twice the size of the damage should be
Always round the corners of the patch to prevent peeling. For extra strength, you may use two patches, applying one inside and one outside the liner if possible.
Step 4: Apply Adhesive and Position the Patch
Spread a generous, even layer of waterproof adhesive on both the patch and the area to be repaired. If the repair is underwater, use an underwater sealant designed to cure while submerged.
Carefully position the patch over the damaged spot, making sure there are no air bubbles underneath. Press firmly from the center outward and hold pressure for at least 60 seconds.
Step 5: Allow Proper Curing Time
Let the adhesive cure according to the manufacturer’s instructions—usually 24 to
48 hours for above-water repairs. For underwater repairs, allow up to 72 hours before refilling the pool or resuming regular use.
Step 6: Watch Some Repairs in Action
If you prefer visual instructions, check out my step-by-step liner repair video here. The demonstration walks you through the process and helps ensure your repair is effective and seamless.
When to Call a Professional
While small tears are great for DIY repair, some situations require expert help:
Tears or rips larger than 4 inches
- Multiple damaged areas across the liner
- Seam separations where liner panels join
- Wrinkles or shifting, which could indicate installation issues
- Extensive fading or brittleness, suggesting that it’s time to replace the liner altogether.
- Inability to locate leaks: Professional leak detection can quickly find hidden pool leaks, saving you from costly repairs.
Preventative Measures to Extend Pool Liner Life
Take these proactive steps to protect your pool liner:
- Maintain proper water chemistry: Keep pH, alkalinity, and chlorine levels balanced to slow down liner deterioration.
- pH: Keep between 4–7.6 to avoid liner damage.
- Alkalinity: Maintain 80–120 ppm to stabilize
- Chlorine: Aim for 1–3 ppm for sanitization without harming the
- Calcium hardness: Keep at 200–400 ppm to prevent scaling or
By adhering to these chemistry balance guidelines, you can significantly extend the durability and appearance of your pool liner, creating a safer and more enjoyable swimming environment.
- Use pool accessories with care: Never drag sharp objects on the Install ladder pads and corner guards to protect vulnerable spots.
- Control water levels: Stick to recommended water Too little water can expose the liner to sun damage; too much can strain the seams.
- Perform frequent inspections: Check your liner monthly for signs of wear or Early action helps avoid bigger issues.
- Winterization: For seasonal pools, winterize the pool properly to guard against freeze damage and debris build-up.
>> Find your supplies here! <<

Keep Your Pool in Perfect Condition
Learning to patch a pool liner empowers you to tackle minor damage quickly and affordably. With the right tools, careful preparation, and smart prevention, you can extend your pool liner’s life and enjoy crystal-clear water all season.
For ongoing concerns or advanced solutions, consider investing in professional-grade pool maintenance equipment that can help automate cleaning and minimize liner wear. Your pool deserves excellent care!